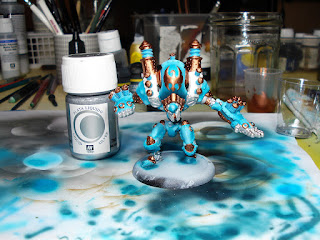
since I had a bit time this weekend, I thought I could do a tutorial on painting the Thunderhead Cygnar Heavy Warjack. I had this one built for quite a while now. The article on how I assembled the model can be found here.
 |
| Preview of the finished Warjack. |
I started priming the figure with Vallejo Polyurethane Grey Primer.
I then basecoated all armour plates with VGC Hawk Turquoise, using my airbrush.
I highlighted all raised areas of the plates with a 1:1 mix of VGC Hawk Turquoise and VMA White.
For some shadows, I applied a 1:1 mix of VGC Hawk Turquoise and VMA Black
When all this was done, I sealed my airbrush work with a coat of VMC Satin Varnish.
For basecoating the coils on the model, I masked the areas with Blu-Tac and applied VGC Electric Blue with my airbrush.
For coherence with the rest of my forces, I painted some of the areas on the model with VMC Ivory.
The ornate metal areas where painted using Vallejo Liquid Gold Copper and the all other metal parts with Vallejo Liquid Silver.
At this point, I again sealed my model with VMC Satin Varnish.
The white metals where given a wash of Soft Body Black Wash, which I mixed according to Les' recipe.
I then worked on the electric coils. I mixed all the colours with VGC Glaze Medium, to extend the working time and smooth out the transitions between the colours. I made sure to always leave some of the previous colours showing, to give the impression of depth. My first highlight was done with a 1:1 mix of VMC Sky Blue and VGC Skull White. I gradually lightened this up with more Skull White, till the last highlight was made with pure VGC Skull White, mixed with VGC Glaze Medium.
All the blue armour plates where hard edge highlighted with VMC Sky Blue.
The last step was working on the metal parts again. I cleaned the washed areas up, using VMA Steel. I also painted all the bolts with a tiny dab, which defined the armour plates quite a bit and added a lot to break up the wide spaces.
Vallejo Liquid Gold Old Gold was used to highlight the copper areas. I took extra care to hit only the areas, which would be in direct sunlight.
As last step, I sealed the finished model with Vallejo Polyurethane Gloss Varnish, before I started to work on the base.
The lip of the base was done with the front arc in Vallejo Extra Opaque Heavy Goldbrown and the back arc in VGC Chaos Black. I then sealed it for good with Vallejo Polyurethane Matte Varnish.
For a bit of narrative flavour, I took some bitz and worked on them with just a basecoat and a heavy coat of pigments, to age them up, so the impression was that of a old battlefield.
The base then was finished in the same way as all my other figures. I then added the narrative piece, and used PVA Glue to place some static grass, a tuft or two and some moss for a bit of variety.
And that's all there's to it. This was one the most fun models I painted so far and I'm very pleased how it turned out. The level of detail is quite high on this one, so take your time and paint in stages, so that you don't fall victim to the dreaded painters burn-out :-).
Cheers,
IK-Painter


Nice Thunderhead!
ReplyDeleteHave you tried washing the bronze bits with sepia ink? It makes gold metals and bronze look mind blowing.