Hey you guys,
it's been a while since my last update, but work has been crazy busy. So here's a quick one for you today: The Malifaux Neverborn Cherub Minion.
Apart from Baby Kade, this has to be the smallest figure I painted so far. As I've been using my airbrush for most of the figure, I'm really starting to get better on brush control when painting small areas at a time.
I cleaned and washed the mini, as the mold release agent really can screw up your paintjob. For added stability, I used a pin, which I glued below the pelvis of the figure. It's quite prominent now, but will be camouflaged during the painting process.
I used Vallejos Polyurethane Grey Primer as I wanted to achieve a neutral and muted look on this piece.
The Wings
I basecoated the wings with VMA White.
I then used VGA Sombre Grey for the lowest part if the wings and then added VMC Ivory for the upper sections. The mixes I used where 1:1 and then 3:1 Ivory to Grey.
When I was done I used a light drybrush of VMC Ivory to bring out the details of the wings and then used Vallejos Polyurethane Gloss Varnish to seal the paintjob, preparing for an oil wash later.
The Body
I basecoated the skin with VGC Dwarf Skin, adding lots of thinner to achieve a translucent mix, which I applied 2-3 coats. The mix was about 5 parts thinner to 1 part paint.
I used the same thin mixture of VGC Cadmium Skin and concentrated on the raised areas of the model. I took care of leaving the darker color in the recesses, for a nice shading effect.
For the extreme highlights, I used the same 5:1 mix of VMC Basic skin, applying it only to the areas the light would hit most, like the pot belly, buttocks and top of the head.
I then used some ground up violet artist pastels and applied it to the darkest shadows of the skin to create some visual interest in these areas. I also locked in the eyes, as at this stage I could fix any mistakes without ruining the rest of the paintjob.
I tried VMC Black as the color for the loincloth, but found the contrast to stark for this model. So I painted over this with VGC Sombre Grey, leaving some Black in the darkest recesses. I also locked in the rest of the details on the model, like the eyebrows and bow.
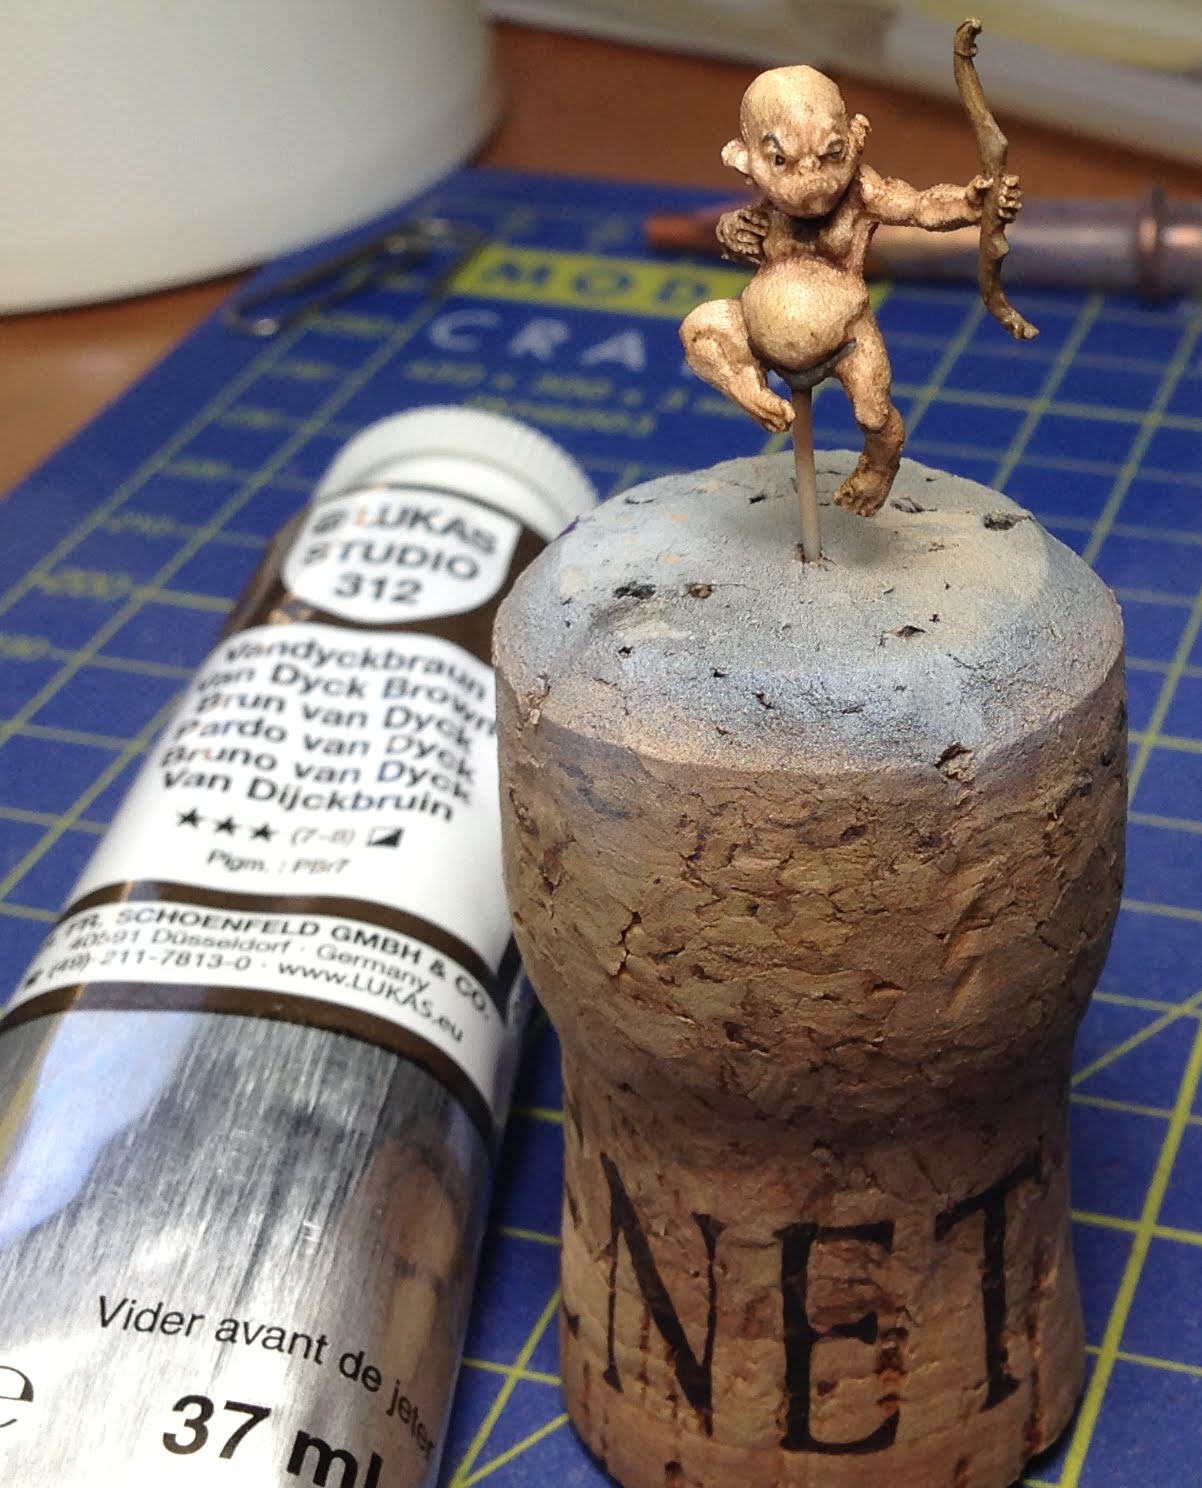
I made a thin oil wash with Van Dyke Brown and applied it liberally to the whole body and wings.
When the oil wash was dry, I used mineral spirits to clean the model, but took care not to remove too much of the wash, as I wanted the figure to have a dirty and grungy look.
For the base I used the same techniques as I've used on the rest of my Malifax Neverborn Crew. I also painted the pink black, which made i blend in more with the rest of the model and camouflaged it nicely.
I hope you enjoyed this small step-by-step as much as I enjoyed painting this figure.
Cheers,
IK-Painter
A blog about my Warmachine and Malifaux forces, and all other painting and hobby related subjects. Enjoy and have fun, comments and criticism are always welcome!
Showing posts with label Weathering. Show all posts
Tuesday, March 12, 2013
Sunday, October 21, 2012
From Zero to Hero: Coppelius - Malifaux Neverborn Minion
Hey guys,
After assembly, I primed the miniature with Vallejos polyurethane gray primer.
I basecoated the coat with VGC Imperial Blue, the hair with VGC Sombre Gray and the skin with me VGC Stonewall Gray.
The coat was highlighted by mixing more and more VGC Magic Blue into the base color concentrating on the folds of the coat.
The trousers were basecoated with VGC Hexed Lichen. For the highlights I mixed VCG Squid Pink into the base color.
The skin was highlighted by glazing VMC White over the gray areas, which were raised to the light.
The eye was based with VGC White and a small amount of VGC Magic Blue was used for the iris. The pupil dot was made with VMA Black. I find it easier working with the Model Air colors because they are thinner and you have more control when painting very fine details.
After giving the model of a heavy coat of gloss varnish I used an oil wash to bring out the fine details.
today I wanted to show you, how I painted my Coppelius figure. In a previous post I stated, how much I hated putting this mini together. Because of that, I only did a very basic paint shop this miniature.
After assembly, I primed the miniature with Vallejos polyurethane gray primer.
I basecoated the coat with VGC Imperial Blue, the hair with VGC Sombre Gray and the skin with me VGC Stonewall Gray.
The coat was highlighted by mixing more and more VGC Magic Blue into the base color concentrating on the folds of the coat.
The trousers were basecoated with VGC Hexed Lichen. For the highlights I mixed VCG Squid Pink into the base color.
The skin was highlighted by glazing VMC White over the gray areas, which were raised to the light.
The eye was based with VGC White and a small amount of VGC Magic Blue was used for the iris. The pupil dot was made with VMA Black. I find it easier working with the Model Air colors because they are thinner and you have more control when painting very fine details.
After giving the model of a heavy coat of gloss varnish I used an oil wash to bring out the fine details.
As Coppelius has a very large fluff focus on eyes I decided to do a slight OSL effect to bring out the eyes of this model. For this I mixed a very thin yellow (VMA Model Air thinned 2:1 with Vallejo Thinner) and applied this mix with my airbrush around the eyes. To highlight the eyes an to give the OSL a focal point, I added a small dot of a 1:1 mix of VMA Yellow and VMC White into the center of each eye. This is important as an OSL effect always goes from light to dark. If you want a glow, you'll need a brighter source for the glow, as otherwise the effect might look off.
All in all one of my less favorite models in the Malifaux range, but I think I captured some of the menace and grittiness of the figure.
Cheers,
IK-Painter
Sunday, September 23, 2012
From Zero to Hero: Lord Chompy Bits - Neverborn Master
Hey you guys,
my painting time in the last weeks was few and far between, but I still managed to get a few figs done. I know, that Lord Chompy Bits (LCB) and the Dreamer are supposed to be one Master, but for convenience I split the tutorials for the two figures.
Am masked the glue spots with Vallejo plastic putty.
The model was primed with black Surface primer.
And then laid down a basecoat of a 50-50 mix of the VGC Black and VGC Cold Grey.
I then used my airbrush to apply a zebithal highlight, using VGC Cold Grey and VGC Stonewall Grey. When I was done, I coated to the whole mini in Gloss Varnish.
I wanted the loincloth to appear to be made out of flayed skin. I applied a basecoat of VGC Dead Flesh.
I then applied random patches of VMC Basic Skintone, to simulate different stages of decay.
The skull plate was painted with VGC Bonewhite.
Highlights where made with a 1:1 mix of VGC Bonewhite and VGC White.
To really bring the rotting of the flayed skin home, I applied red and blue ink to the folds to mix different shades of purple in the recesses. When this was done to my satisfaction. I coated the whole model with gloss varnish.
All in all a fun model to paint. I just don't really like the pose of the model, as any details on the head are lost because of the wide open maw. Finally, I leave you with some shots of the finished figure.
Cheers
IK-Painter
my painting time in the last weeks was few and far between, but I still managed to get a few figs done. I know, that Lord Chompy Bits (LCB) and the Dreamer are supposed to be one Master, but for convenience I split the tutorials for the two figures.
Am masked the glue spots with Vallejo plastic putty.
The model was primed with black Surface primer.
And then laid down a basecoat of a 50-50 mix of the VGC Black and VGC Cold Grey.
I then used my airbrush to apply a zebithal highlight, using VGC Cold Grey and VGC Stonewall Grey. When I was done, I coated to the whole mini in Gloss Varnish.
I wanted the loincloth to appear to be made out of flayed skin. I applied a basecoat of VGC Dead Flesh.
I then applied random patches of VMC Basic Skintone, to simulate different stages of decay.
The skull plate was painted with VGC Bonewhite.
Highlights where made with a 1:1 mix of VGC Bonewhite and VGC White.
To really bring the rotting of the flayed skin home, I applied red and blue ink to the folds to mix different shades of purple in the recesses. When this was done to my satisfaction. I coated the whole model with gloss varnish.
All in all a fun model to paint. I just don't really like the pose of the model, as any details on the head are lost because of the wide open maw. Finally, I leave you with some shots of the finished figure.
Cheers
IK-Painter
Sunday, May 20, 2012
From Zero to Hero: Ol'Rowdy - Cygnar Character Heavy Warjack
Hey guys!
I've built Ol'Rowdy way back and finally decided it's time to slap some paint on him. This also gave me the chance to experiment a bit and giving Oil Washes a first try.
| Preview of the finished model |
Labels:
Airbrush,
Cygnar,
From Zero to Hero,
Warmachine,
Weathering
Thursday, April 12, 2012
How to shade cloth - 4 very different techniques
Hey guys,
as I worked on my Cygnar forces for a while now, I had ample opportunity to shade cloth. In this time, I tried out many different techniques, which I wanted to share with you. I will be covering layering, washing, airbrushing and using dry pigments in this article.
| Layering |
| Washing |
| Using Pigments |
| Airbrushing |
Sunday, March 4, 2012
From Zero to Hero: Thunderhead - Cygnar Character Warjack
Hey guys,
since I had a bit time this weekend, I thought I could do a tutorial on painting the Thunderhead Cygnar Heavy Warjack. I had this one built for quite a while now. The article on how I assembled the model can be found here.
| Preview of the finished Warjack. |
Labels:
Airbrush,
Cygnar,
From Zero to Hero,
Warmachine,
Weathering
Monday, January 16, 2012
From Zero to Hero XII: Cygnar Warjack Wreck Markers
Tuesday, December 20, 2011
Tools of the Trade: Different fixers for Weathering Powders
Hey you guys,
a few weeks back I posted my thoughts on the uses of Weathering Powders. Since then I had the chance to experiment further with them and I found three different fixers for applying them wet and the pros and cons of using them.
1. Water as a fixer
a few weeks back I posted my thoughts on the uses of Weathering Powders. Since then I had the chance to experiment further with them and I found three different fixers for applying them wet and the pros and cons of using them.
1. Water as a fixer
| Rust pigments with water |
Tuesday, December 13, 2011
From Zero to Hero XI: The Lancer - Cygnar Light Warjack
Tuesday, November 29, 2011
From Zero to Hero X: Reinholdt, Gobber Speculator - Mercenary Solo
Hey guys!
For my first non Cygnar mini, I chose Reinholdt because he is so very different from the Warmachine models I painted before.
Wednesday, November 2, 2011
From Zero to Hero IX: Stormguard - Cygnar Unit Box
Hey all,
I recently finished my first Warmachine Unit, the Cygnar Stormguard, and wanted to share how I did it.
First off, I painted two test-minis with two different approaches. The rest of the Unit was then done as a batch painting, as soon as I figured out the best way to go about it. This tutorial will cover both approaches, as well as the steps needed for the whole squad.
I recently finished my first Warmachine Unit, the Cygnar Stormguard, and wanted to share how I did it.
First off, I painted two test-minis with two different approaches. The rest of the Unit was then done as a batch painting, as soon as I figured out the best way to go about it. This tutorial will cover both approaches, as well as the steps needed for the whole squad.
Saturday, October 15, 2011
From Zero to Hero VIII: Defender / Triumph - Cygnar Heavy / Character Warjack
Hey all,
in this tutorial, I will take you through how I painted my magnetized Defender / Triumph Warjack. Special techniques I used where pre-shading, OSL and weathering.
I started priming the model with my airbrush with Vallejos Polyurethane Acrylic Grey Primer. After this was dry, I started pre-shading the whole model, using black in all the recesses and white on all the high spots. After the mini was shaded, I applied thin and even layers of my main color, Hawk Turquoise, making sure that the shadows and highlights would still be visible. The end result was a nice and even basecoat with clearly defined but soft shadows and highlights.
You have to be careful after applying your color with an airbrush, as the coat is very thin and delicate. For protection, I sprayed the whole mini with gloss varnish.
I then added Ivory on some armor plates of the mini, to tie it in with the rest of my Cygnar forces.
in this tutorial, I will take you through how I painted my magnetized Defender / Triumph Warjack. Special techniques I used where pre-shading, OSL and weathering.
I started priming the model with my airbrush with Vallejos Polyurethane Acrylic Grey Primer. After this was dry, I started pre-shading the whole model, using black in all the recesses and white on all the high spots. After the mini was shaded, I applied thin and even layers of my main color, Hawk Turquoise, making sure that the shadows and highlights would still be visible. The end result was a nice and even basecoat with clearly defined but soft shadows and highlights.
You have to be careful after applying your color with an airbrush, as the coat is very thin and delicate. For protection, I sprayed the whole mini with gloss varnish.
I then added Ivory on some armor plates of the mini, to tie it in with the rest of my Cygnar forces.
| Preshading all done |
Subscribe to:
Posts (Atom)
